
Technical details
What is Histology?
Histology (compound of the Greek words: ἱστός histos "tissue", and -λογία -logia "science") is the study of the microscopic anatomy of cells and tissues of plants and animals. (source Wikipedia)
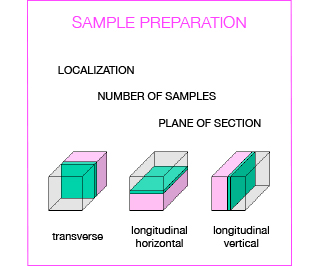
Several steps are crucial to obtain a valuable histological analysis, including sample collection, fixation, trimming, embedding, and sectioning. Depending on the model under investigation and the design of the study, tissue/organ sampling should be carefully programmed by the researcher:
- which organs/tissues do you want to sample
- which portion of the organ
- how many samples overall
Before starting with a complex experiment, it is advised to perform a pilot study to set up the entire procedure (from collection to histology analysis) and to identify potential target organs. In this context, application of a systematic necropsy procedure is indispensable to the identification of gross pathological changes and the selection of the organs to be sampled.
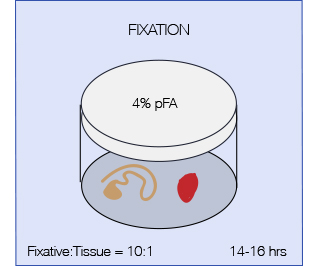
The aim of fixation is to preserve specimens permanently and to arrest the degenerative processes which starts when the tissue is deprived of its blood supply. Therefore fixation should be started as quickly as possible after removal of the tissue or after death of the animal (in case of perfusion). A perfect fixative that fits it all does not exist, but the most commonly used fixative in histopathology is 4% pFA (paraformaldehyde). pFA forms intermolecular bridges with the side-chains of basic amino acids and with free amino groups, creating a network of linked antigens. In this way the cell structure is preserved better but as a drawback the antigenicity of some proteins will be reduced. Less commonly used fixatives are Formaldehyde (10%, contains methanol as a stabilizer which might interfere with some applications) and Bouin’s fixative (particularly indicated for fragile tissues such as testis).
Important parameters are:
pHFixation is best carried out close to neutral pH. Acidity promotes the formation of a formalin-heme pigment that will appear as a black deposit on tissue sections.
PenetrationFormalin penetration is slow, so it is advisable trim the tissue in 2-3 mm sections prior to fixation to assure uniform fixation throughout the tissue.
VolumeIt is essential that the fixative is in great excess to the tissue, 10:1 ratio of fixative to tissue is recommended. Agitation will accelerate fixation.
Concentration4% pFA is the standard concentration, but for some antibodies it might be necessary to reduce pFA concentration down to 0.25% to preserve antigenicity.
Time to fixationThe time interval from tissue removal to fixation is very important, because drying and decomposition of the tissue can introduce artifacts.
Time of fixationTo prevent morphological changes, fixation time must be optimized for each sample; for most tissues ON fixation (14-16 hrs) is recommended (shorter times might apply for embryos and fragile tissues and should be tested). Over fixation should be avoided as it can increase autofluorescence of the tissue and might render some antigens irretrievable.
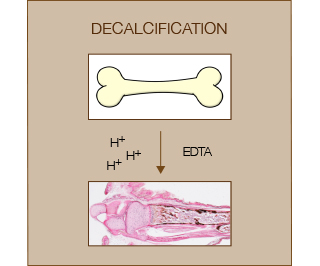
Decalcification of bones from postnatal animals is usually performed to obtain good quality sections for the evaluation of bone marrow, tumors and infections. Decalcification is performed after a strong fixation step and before paraffin processing (or cryo-embedding).
Decalcification can be achieved using strong/weak acids or chelating agents. Acids are usually relatively fast but negatively affect tissue preservation and nuclear staining. Chelating agents such as EDTA are very gentle but also very slow to achieve complete decalcification (weeks). Commercial kits (e.g. BioOptica) usually contain a mixture of acid and chelating agents in order to achieve a balance between tissue preservation and speed of decalcification.
Of note, incomplete decalcification can lead to tissue distortions, over-decalcification can deteriorate the tissue and spoil staining. Thus the endpoint should be carefully determined.

Some mouse organs are small enough that they can be embedded as a whole (e.g. spleen). Larger organs/lesions (e.g. liver, xenografts) should be trimmed to a thickness of 2-3 mm before processing to allow complete permeation of paraffin. Standardization of trimming procedures of organs is required for a correct histopathological examination i.e. by defining the sites at which samples should be taken and the amount of tissue which should be trimmed. There are guidelines developed for toxicological studies that in many cases can be adopted in experimental pathology.
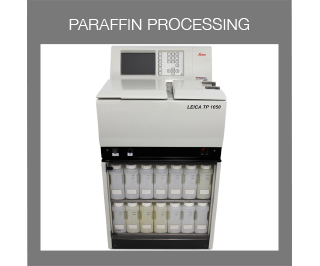
After fixation, tissues are infiltrated by liquid paraffin which solidifies at room temperature and thus provides solid support to allow cutting of the tissue into thin sections (3-5 μm) at the microtome. Since paraffin is hydrophobic, prior to paraffin infiltration all the water present in the specimen is removed by passing it through a series of graded ethanol solutions, a process called dehydration. Since also ethanol and paraffin are not compatible with each other, ethanol is subsequently replaced by ‘clearing’ of the tissue with an organic solvent (Xylene or Histoclear). The tissue is then infiltrated with liquid paraffin at 60 °C.
Below you find the sequence used in the facility with an automated tissue processor. For manual processing of small and fragile samples (e.g. embryos) we validated an alternative protocol, which is available upon request.
| Time | Temperature | |
| DEHYDRATION | ||
| Ethanol 70 % | 2 hrs | 35 °C |
| Ethanol 80 % | 2 hrs | 35 °C |
| Ethanol 90 % | 2 hrs | 35 °C |
| Ethanol 95 % | 2 hrs | 35 °C |
| Ethanol 95 % | 2 hrs | 35 °C |
| 3 x Ethanol 100 % | 2 hrs | 35 °C |
| CLEARING | ||
| 2 x Xylene | 1.5 hrs | 35 °C |
| INFILTRATION | ||
| 3 x Paraffin Wax | 6 hrs | 62 °C |
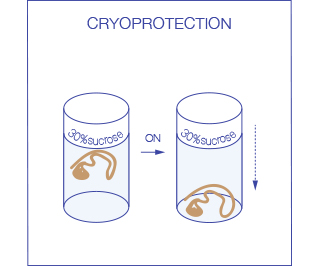
Ideally after fixation tissues are first cryo-protected in 30% sucrose (leave the tissue in the solution at 4 °C until it sinks, usually ON) to prevent damage to the tissue during the freezing process. Subsequently they are frozen in OCT: the use of an embedding medium protects the tissue from drying during storage and supports it during sectioning.
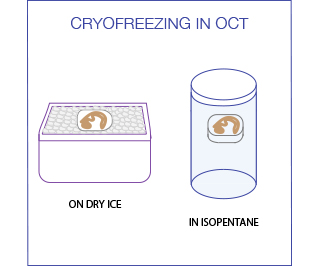
For freezing in OCT, immerse the tissue in a plastic mold filled with OCT and then place it on a dry ice until the embedding medium is totally frozen. An alternative method exists that uses Isopentane (2-methyl butane) chilled in liquid nitrogen to -80C. This rapid freezing reduces ice crystal formation and minimizes morphological damage to the tissue. Samples should be completely immersed in the liquid nitrogen cooled Isopentane for 30-90 seconds (the exact time depends on sample size) and then in the liquid nitrogen for an additional 30 seconds. The samples can then be stored at -80°C or be used immediately for sectioning.
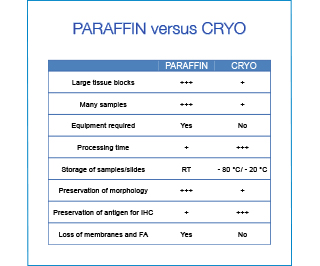
For routine purposes paraffin embedding is the most convenient solution. The processing is automated (+ reproducibility), many samples can be processed simultaneously, and the tissue blocks can be stored at room temperature requiring little space. However if time is an issue or the preservation of the antigenicity for tricky antibodies, freezing and cryosectioning might be the better choice.
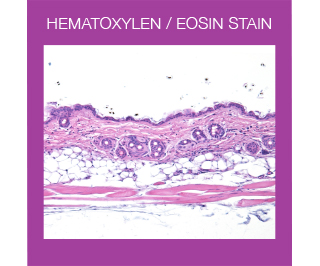
For routine examination, Haematoxylin and Eosin (HE) is the most widely used stain in histology. This stain colors different tissue structures, which would otherwise be transparent, so that you can get a detailed view of the tissue. Hematoxylin reacts like a basic dye with a purplish blue color. It stains acidic, or basophilic, structures including the cell nucleus (which contains DNA and nucleoprotein), and organelles that contain RNA such as ribosomes and the rough endoplasmic reticulum. Eosin is an acidic dye that is typically reddish or pink. It stains basic, or acidophilic, structures, which includes the cytoplasm, cell walls, and extracellular fibers.
What are special stains?
The term “special stains” is used to refer to a large number of alternative staining techniques that are used when the H&E does not provide all the information the pathologist or researcher needs. Examples of special stains are Oil red O for fat or Picro-Sirius red stain for collagen identification.
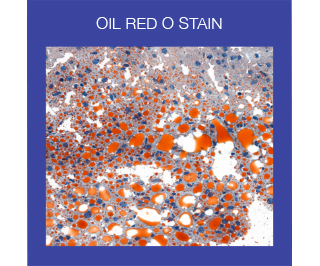
ORO is used to demonstrate the presence of fat or lipids in fresh frozen tissue sections. It is performed on fresh frozen sections because fixatives containing alcohols, or routine tissue processing, will remove lipids. Like most stains used to detect lipids, ORO is not a true stain, since it cannot form bonds with lipids. It is a pigment that functions as an oil-soluble colorant. When ORO is combined with Hematoxylin, the result of the stain is brightly red stained fat and lipids and blue nuclei.
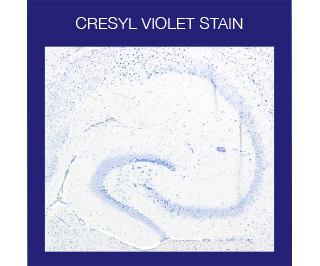
The Cresyl Violet method uses a basic aniline dye to stain RNA blue and is typically used as a differential stain for Neurons. Neurons contain Nissl substance, which is primarily composed of rough endoplasmic reticulum, with the amount, form, and distribution varying in different types of neurons. Because of the RNA content, Nissl substance is very basophilic and will be very sharply stained with Cresyl Violet.
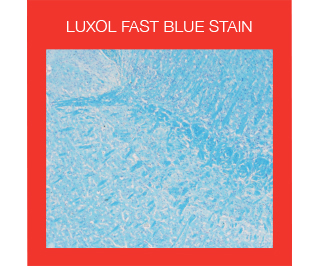
The Luxol fast blue stain is used to identify myelin in nervous tissue. Luxol fast blue dye is a derivative of tetrabenzotetrazo-porphyrin, which has a selective affinity for phospholipidic structures, such as lecithin and sphingomyelin, and choline bases of myelin.
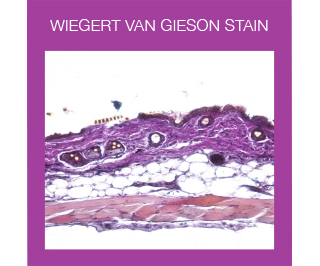
Weigert Van Gieson is a two-part combination stain that enables differentiation of connective tissue components. Weigert staining is based on the affinity of resorcin/basic fuchsin towards elastic fibers and its precipitation in the presence of ferric chloride. Counterstaining with Van Gieson trichromic stain (a mixture of picric acid and acid fuchsin) allows the differentiate collagen from connective tissue and the visualization of nuclei.
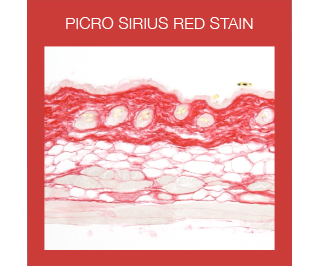
The Picro-Sirius Red is used in the histological visualization of collagen I and III fibers in paraffin-embedded tissue sections. PSR stained collagen appears red in light microscopy.
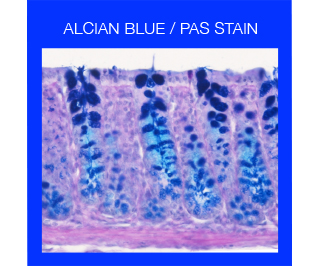
Alcian Blue stains strongly acidic mucins blue, nuclei pink to red, and cytoplasm pale pink. Periodic acid–Schiff (PAS) detects polysaccharides such as glycogen, glycoproteins, glycolipids, proteoglycans as well as neutral and acidic mucins, allowing for example the identification of hepatic glycogen, intestinal goblet cells and basal laminae. Alcian/PAS is a combined method utilizing the properties of both the PAS and Alcian blue stain to demonstrate the full complement of tissue proteoglycans, allowing the demonstration of both acidic and neutral mucins in tissues. In the combined protocol acidic mucins are first staining with Alcian blue thereby preventing their reaction during the subsequent PAS staining which will color neutral mucins in magenta.

The Von Kossa stain is used for the histological visualization of calcium deposits in undecalcified paraffin or frozen sections. The stain is based on a precipitation reaction in which calcium is reduced by exposure to strong light allowing silver ions to displace it and to react with phosphate or carbonate. The metallic silver is then visible as a brown/black deposit.
What is difference between direct and indirect immunohistochemistry?
Immunohistochemistry (IHC) is a powerful method for localizing specific antigens based on antigen–antibody interaction: since antibodies are highly specific, the antibody will bind only to the protein of interest in the tissue section. This interaction can be visualized using either chromogenic or fluorescent detection. Chromogenic detection is based on the activities of enzymes, e.g. horseradish peroxidase (HRP), which form colored, insoluble precipitates upon the addition of a substrate, such as DAB.
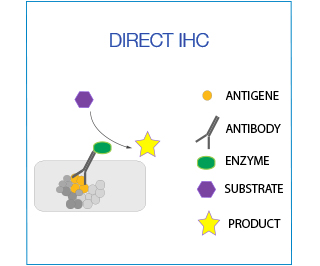
In direct IHC the antibody is directly conjugated with the enzyme/fluorochrome. This is ideal for co-localization studies in which two antibodies from the same species are being used.
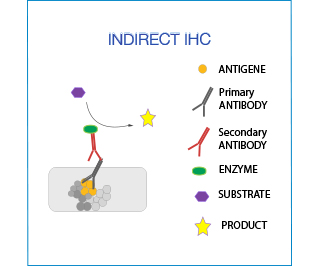
In indirect IHC the primary antibody is detected by a secondary antibody, which is conjugated with the enzyme/fluorochrome. This method is very versatile (no need for direct labeling of the antibody).
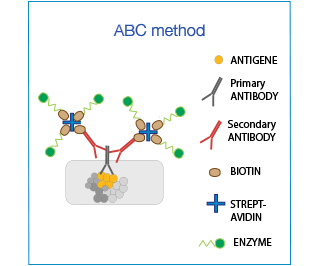
The Biotin-Avidin-Complex (ABC) system is used to enhance sensitivity. It is based on the ability of (Strept)avidin to bind to 4 biotin moieties simultaneously: one attached to the antibody and 3 conjugated to the enzyme, thereby amplifying the signal up to 3-fold.
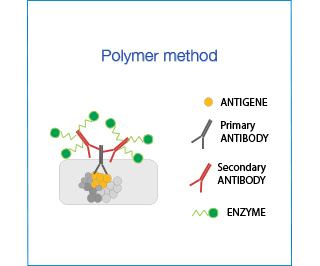
Polymer Systems have the advantage of not containing biotin or avidin and are particularly indicated in tissues with high endogenous levels of these molecules (e.g. intestine). However, their hydrophobic backbone might cause unspecific binding thus background staining must be carefully controlled.
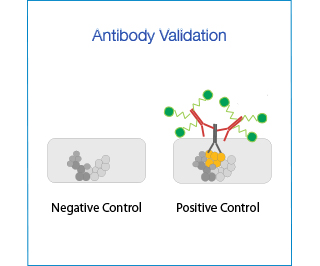
To validate an antibody for immunohistochemistry (IHC), one must demonstrate its specificity for the protein of interest, through the use of appropriate negative and positive controls.
- Negative controls: cell line or tissue that is known not to express the protein of interest (e.g. KD cells, tissues from KO mice).
- Positive controls: cell line or tissue that is known to (over-)express the protein of interest.
- dilutions of the primary antibody
- methods for detection of the primary antibody e.g. ABC versus Polymer kit
- antigen retrieval protocols and blocking reagents.
More informations
- Vincenzo Covelli - Guide to the Necropsy of the Mouse
- UC Davis virtual necropsy
- Recent review on the effect of fixation on downstream applications
- Revised guides for organ sampling and trimming in rats and mice
- Short guide on trimming of tissues
- NIH visual guide for sampling and trimming
- An overview over different decalcification protocols by Leica
- Excellent guide to special stains
- Ramos-Vara JA, Miller MA. When tissue antigens and antibodies get along: revisiting the technical aspects of immunohistochemistry--the red, brown, and blue technique. Vet Pathol. 2014 Jan;51(1):42-87.
- Bordeaux J, Welsh AW, Agarwal S, et al. Antibody validation. BioTechniques. 2010;48(3):197-209.
- Howat WJ, Lewis A, Jones P, Kampf C, Pontén F, van der Loos CM, Gray N, Womack C, Warford A. Antibody validation of immunohistochemistry for biomarker discovery: recommendations of a consortium of academic and pharmaceutical based histopathology researchers. Methods. 2014 Nov;70(1):34-8.
Mouse necropsy:
Fixation:
Organ Sampling and Trimming:
Decalcification:
Stains:
Various Reviews on Antibody Validation for Immunohistochemistry:
Cogentech S.R.L. Società Benefit a Socio Unico soggetta all’attività di direzione e coordinamento di IFOM - Istituto Fondazione di Oncologia Molecolare ETS
Registered Office: via Adamello 16, 20139 Milan, Italy – Fully paid up share Capital 1.100.000 €
Local Unit: c/o Parco Scientifico e Tecnologico della Sicilia S.c.p.a. - Z.I. Blocco Palma I, Stradale V. Lancia, 57 - 95121 Catania
Tax Code, VAT and Milano, Monza, Brianza and Lodi Chamber of Commerce Register n. 04641450962 - R.E.A. MI-1763886